


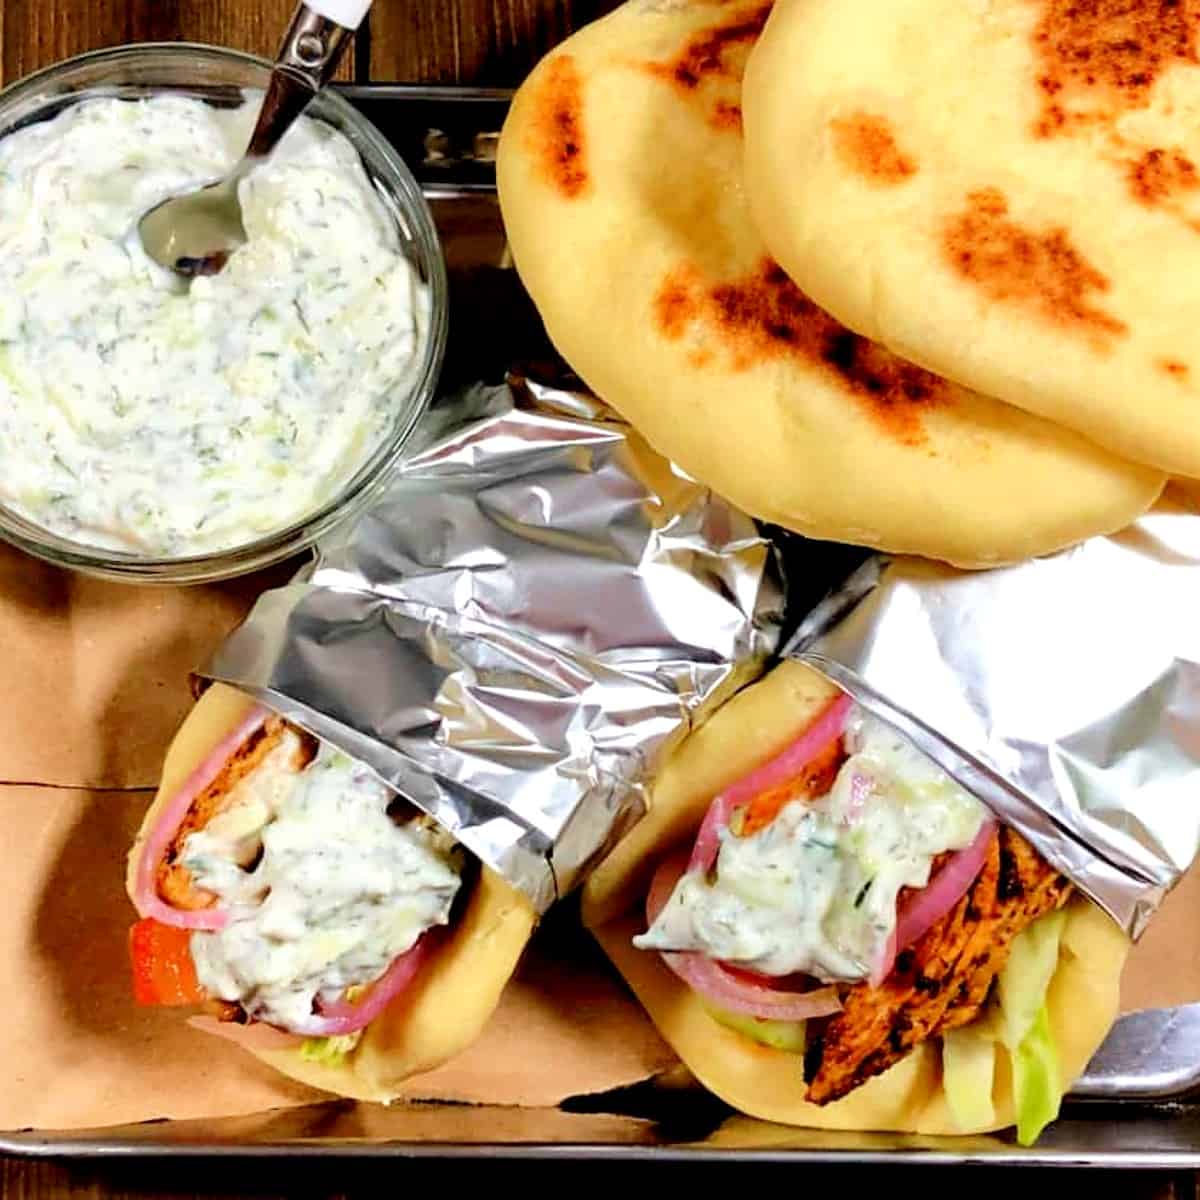
These easy Greek Chicken Pita Wraps have homemade tzatziki sauce and Greek-inspired spiced chicken to make a delicious and healthy meal everyone will love. You can use store-bought pita bread or even make your own!
Jump to:
Why I Love This Recipe
I love this Greek Pita Wraps with Chicken recipe because the juicy, herb-infused chicken combined with warm pita bread, crisp veggies, and a dollop of creamy tzatziki sauce makes it a delightful culinary journey in every bite. This recipe is also easy to make and easy to customize to taste with different toppings like Mediterranean Hummus, just like my Shawarma Chicken Wraps.
Once you have the pitas and the chicken marinaded, the rest of this meal comes together quickly just like my Spicy Shrimp Ramen with Peanut Butter and my Stovetop Chili Recipe. Don't settle for a boring meal when you can make this flavor-packed handheld delight!
How to Make Greek Pita Wraps with Chicken
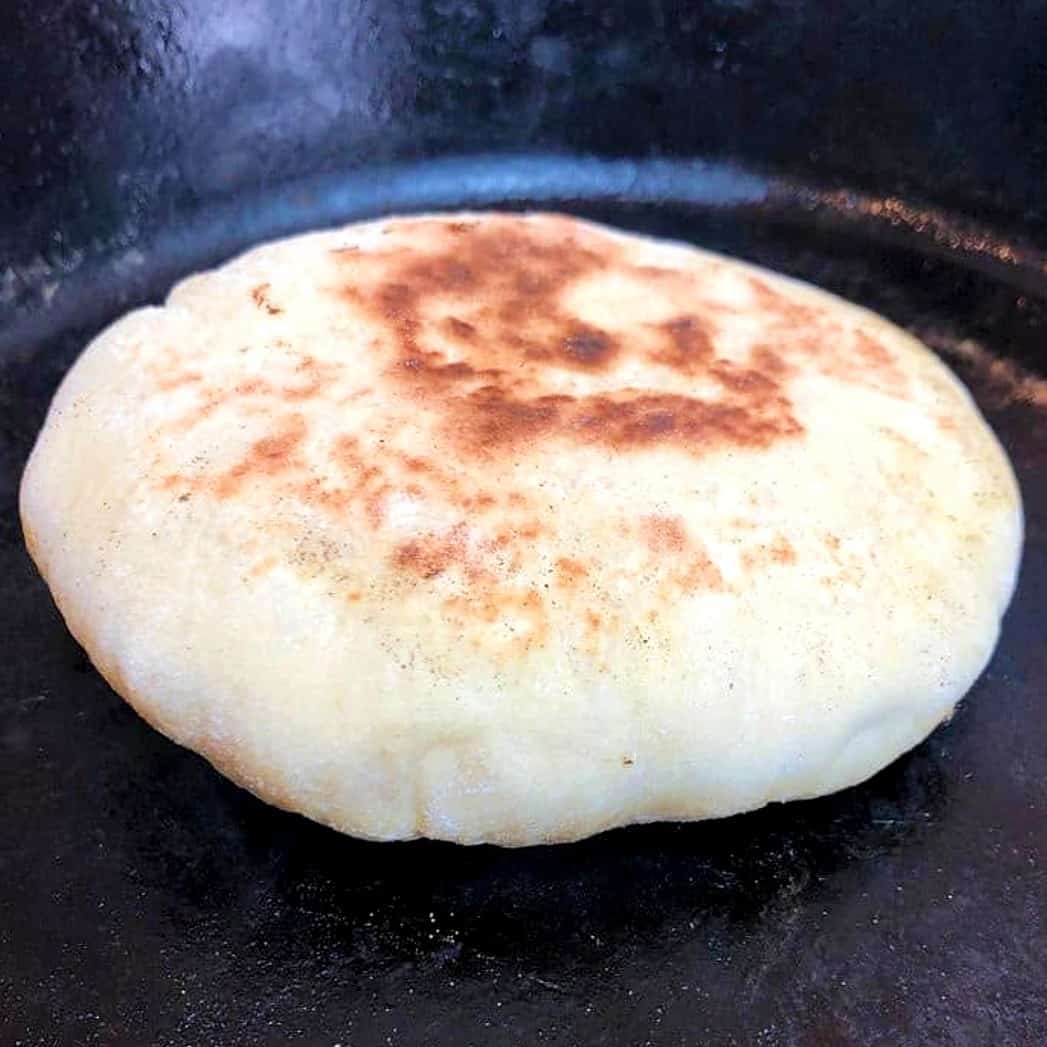
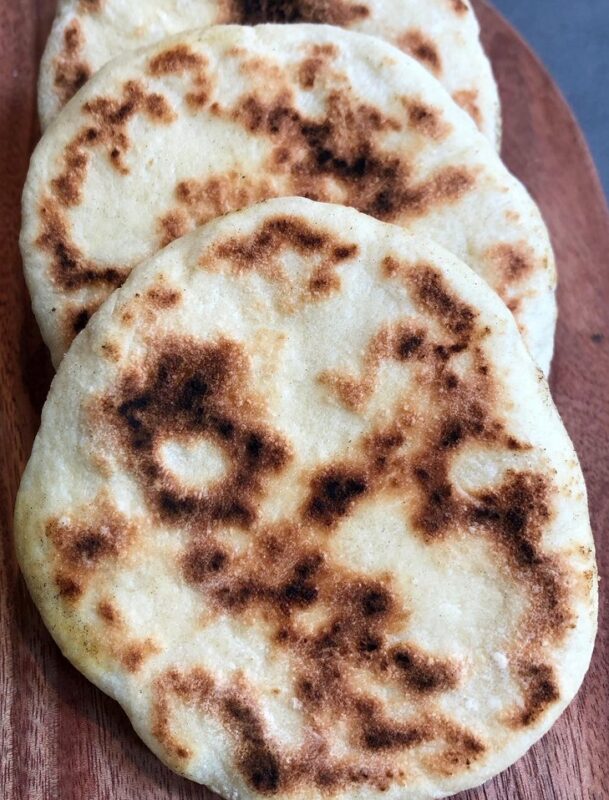
Step 1: If you are going to make homemade pitas, make them ahead of time. They take a little over 3 hours from start to finish because of rise time, but it's worth it!
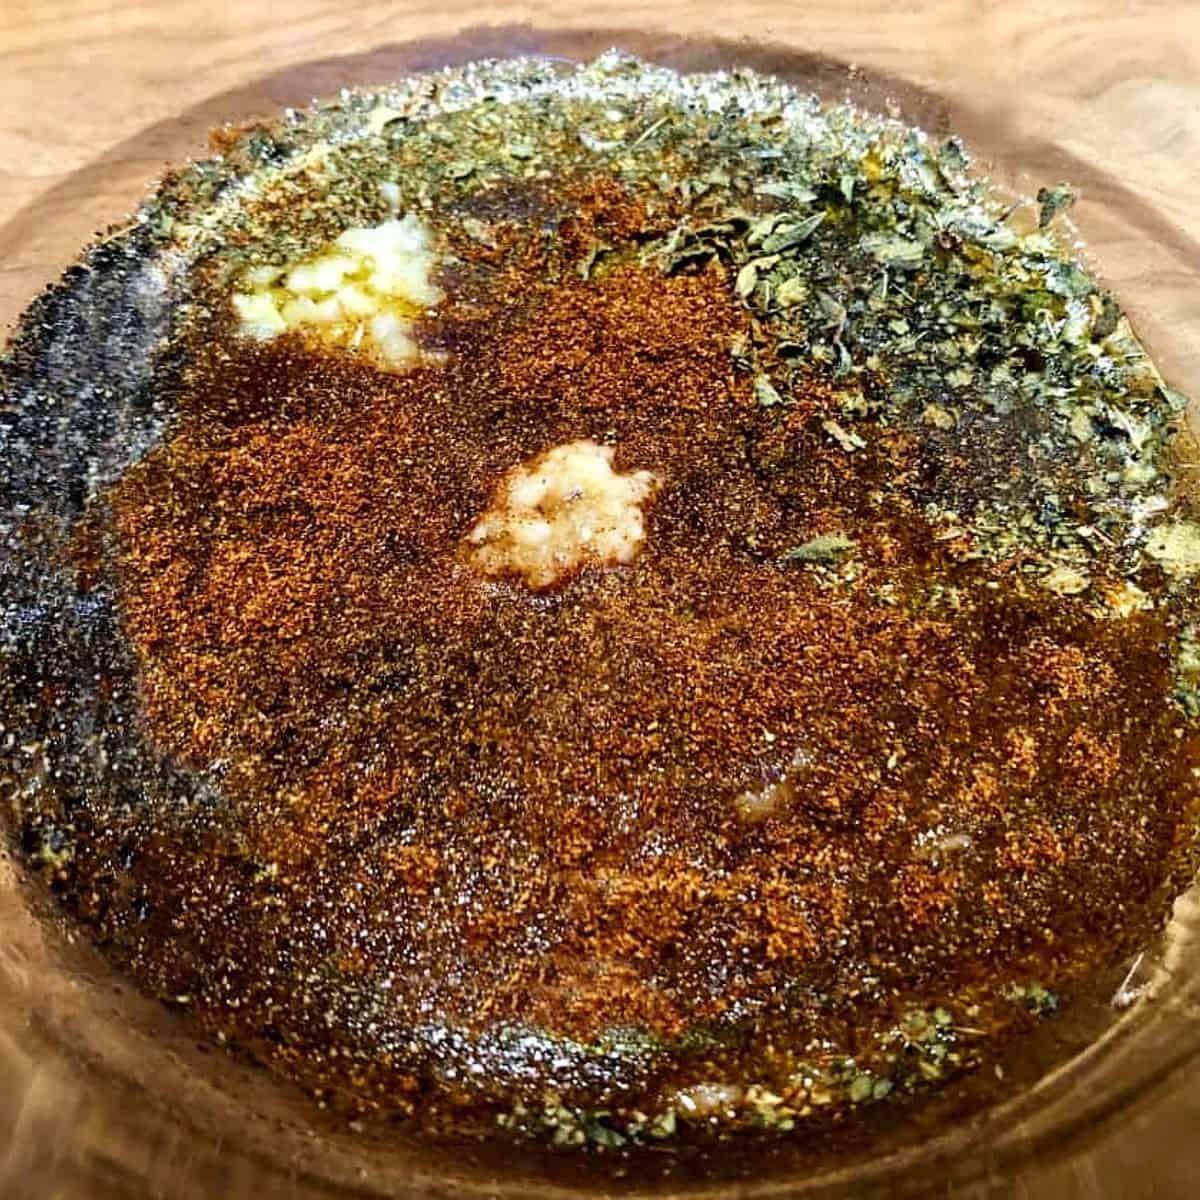
Step 2: Mix the marinade ingredients into a mixing bowl. Add the chicken and ensure it is fully coated in marinade Cover the bowl with plastic wrap and marinate for at least an hour in the fridge.

Step 3: Make the tzatziki sauce by adding all of the ingredients for the sauce into a bowl and string until combined. Place in the fridge so all of the flavors have time to blend and chill.
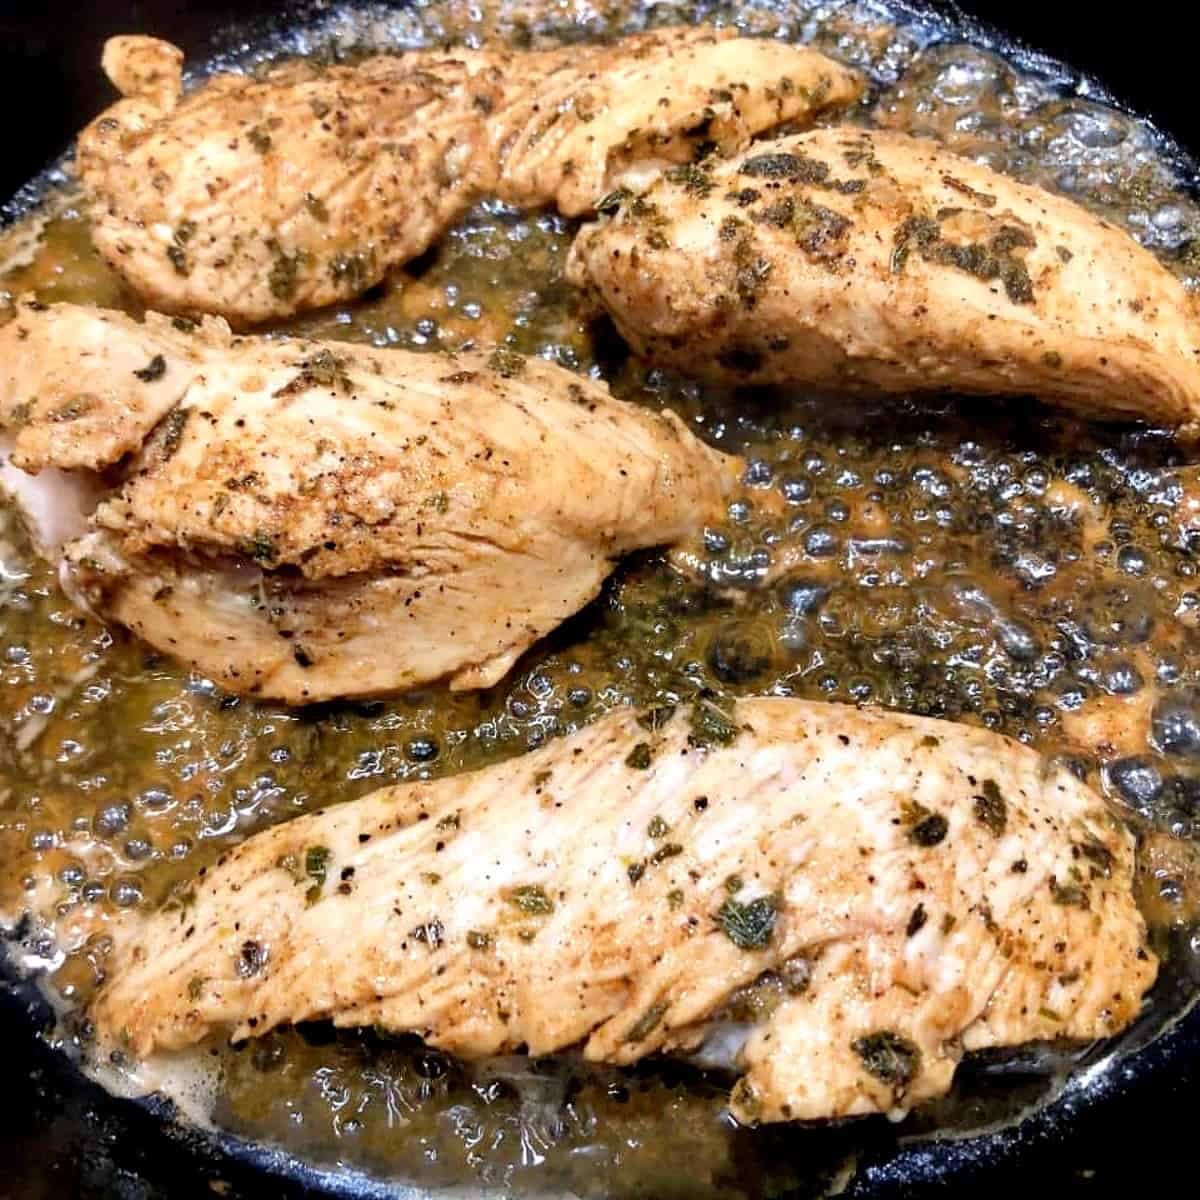
Step 4: Heat the skillet over medium-high heat and add the marinated chicken pieces and the marinade to the skillet. Cook for 4-5 minutes on each side until fully cooked (internal temperature of 165°F).
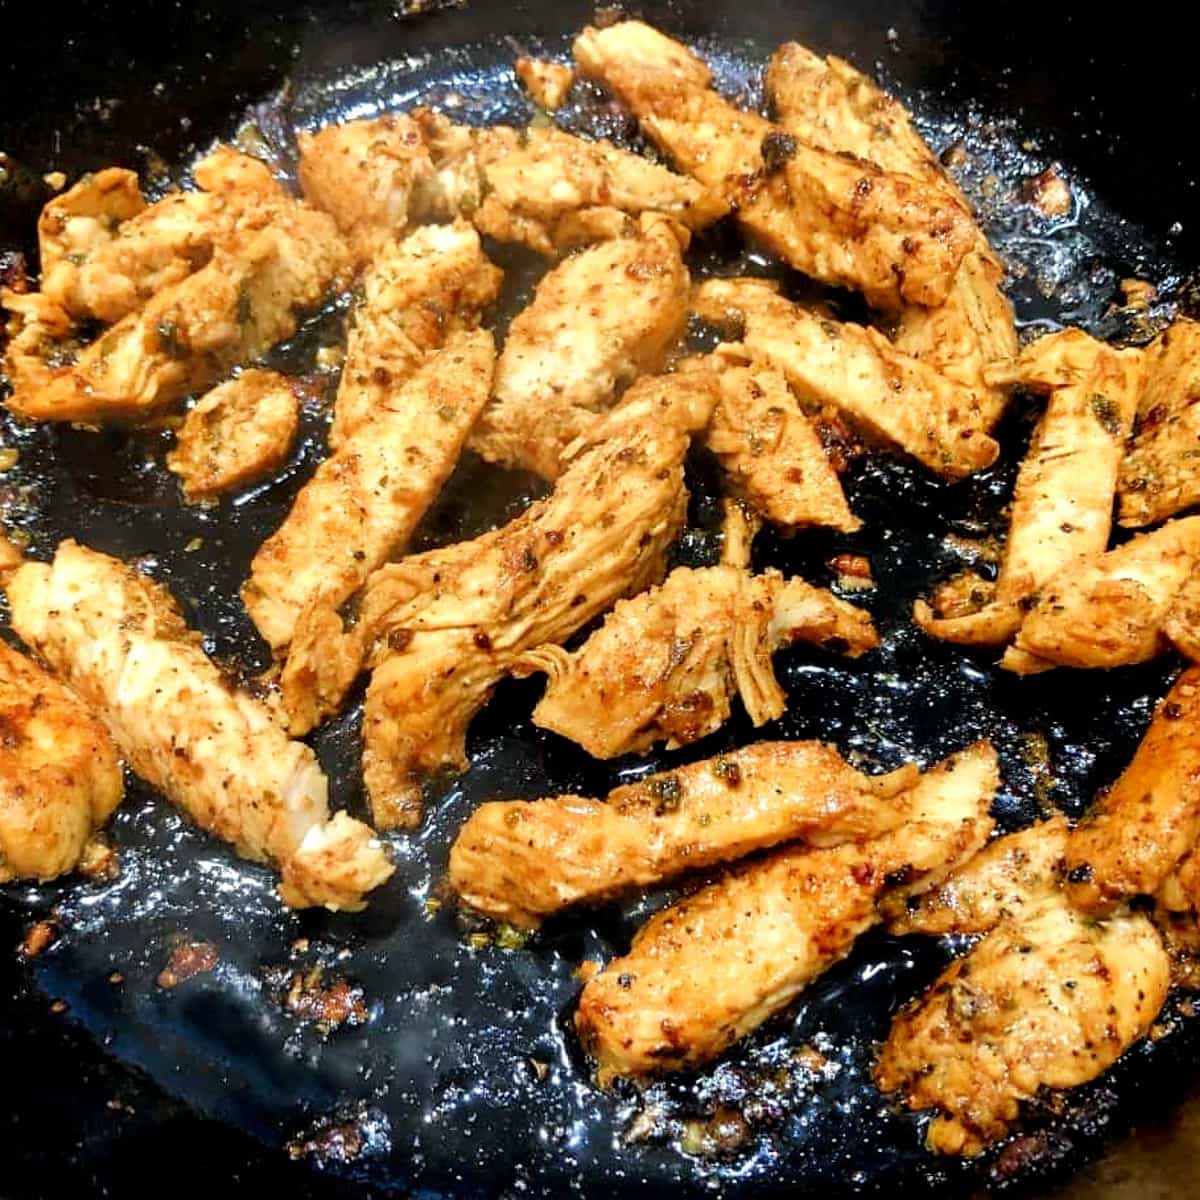
Step 5: Remove the chicken and slice it into strips. Add the chicken back into the skillet to get more of the marinade coated on the chicken pieces, just a minute or two.
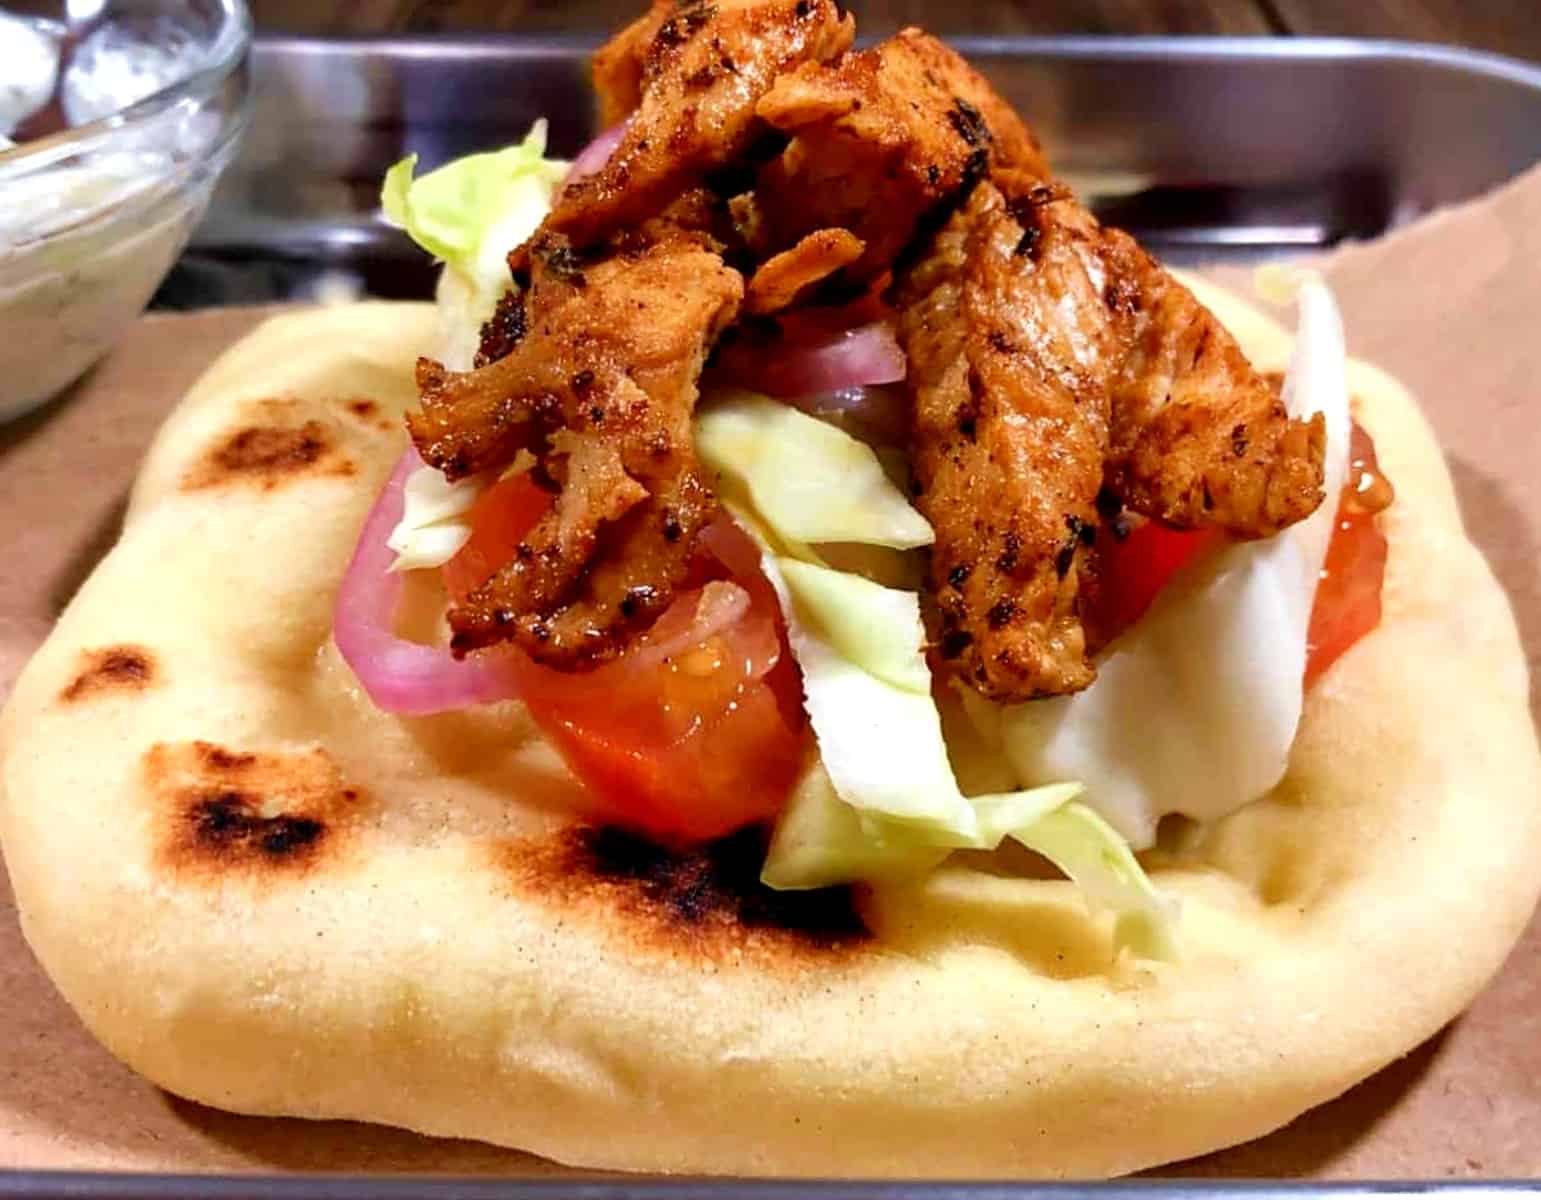
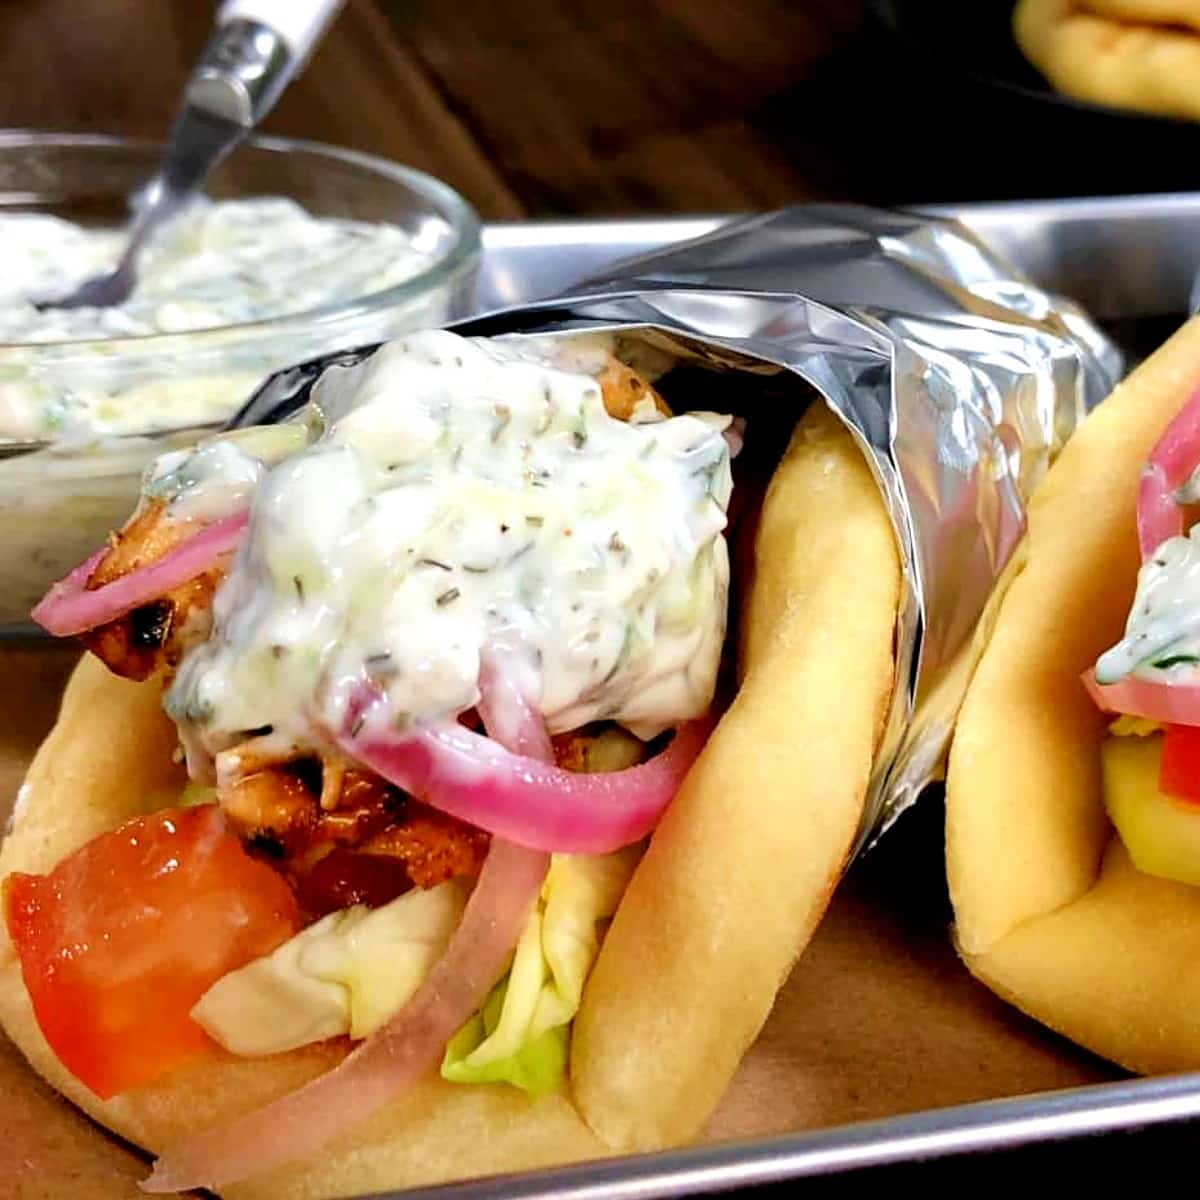
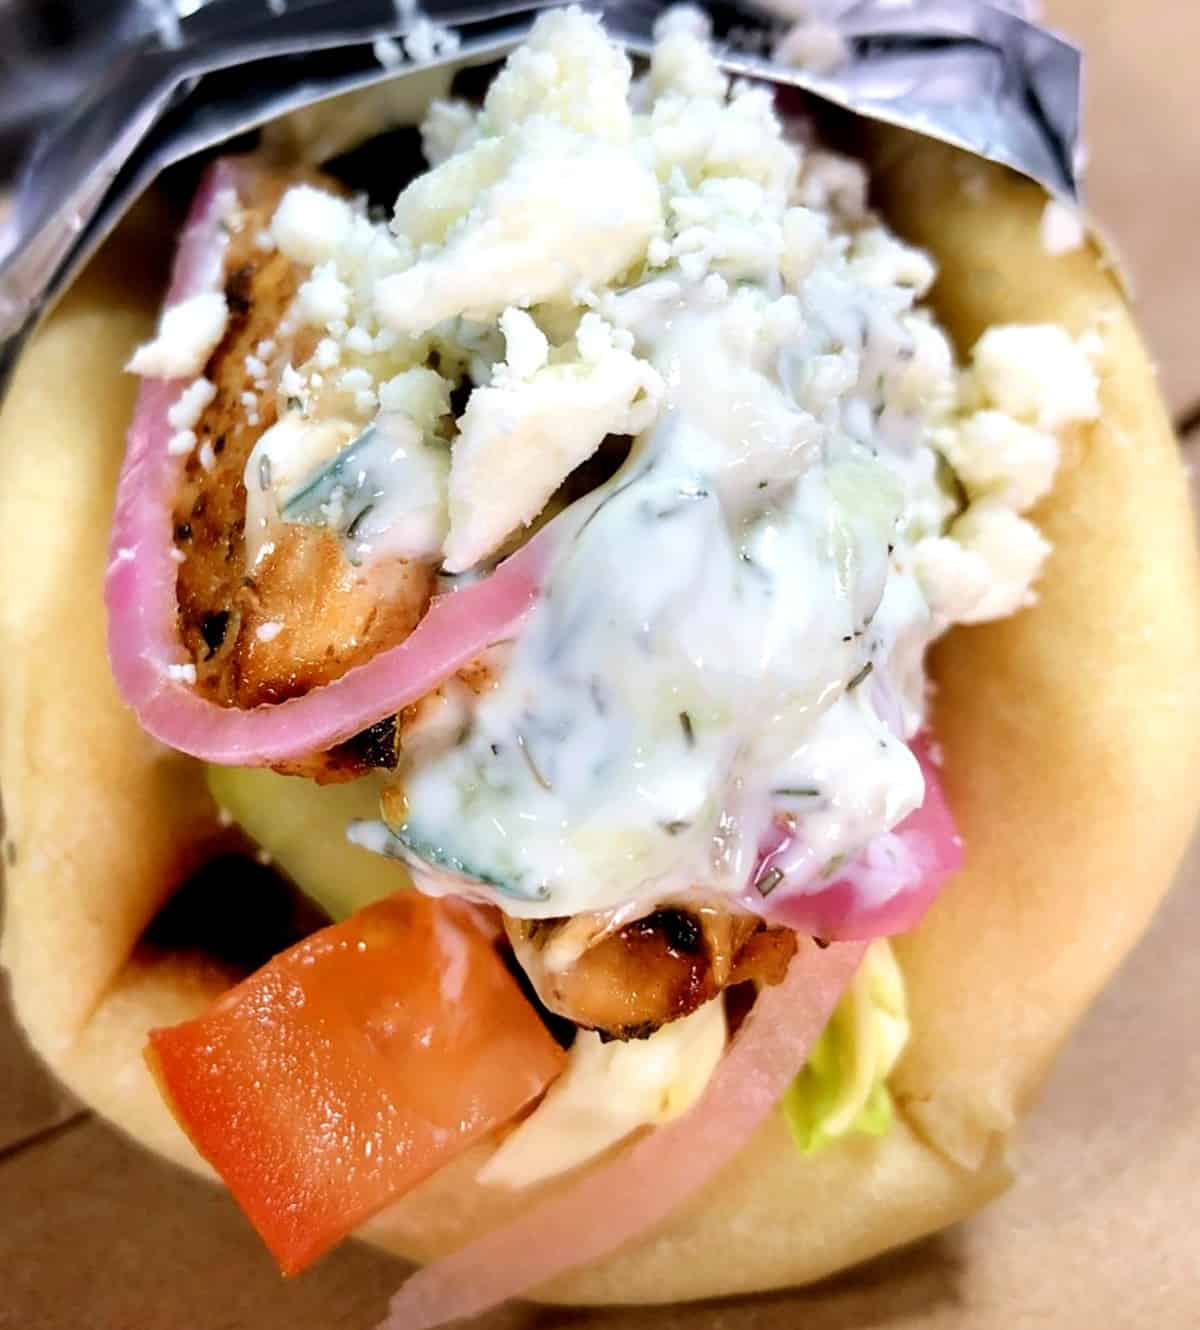
Step 6: Take a pita bread and place it on a plate. Layer the sliced cucumber, tomato, cabbage/lettuce, and red onion slices first. Then add strips of chicken and top with Tzatziki sauce and feta cheese.
Use Store-Bought Pitas or Make Your Own
There is something to be said for homemade bread, and homemade pita bread is no exception. It does take just over 3 hours from start to finish to make fresh pita bread, mostly because of the rise time, but I can confidently say it's worth it!
You only need 5 ingredients that you probably already have in your pantry: active dry yeast, water, flour, olive oil, and salt. That's it! Check out my Quick Pita Bread Recipe for the full recipe.
Make Quick-Pickled Onions for a Topping
You can use whatever toppings you love or have on hand but I will tell you, pickled onion adds a little extra something that makes a big difference. You can make these ahead of time, and in my opinion, you should have these in your fridge at all times anyway. They are great on these pita wraps, tacos, salads, and more.
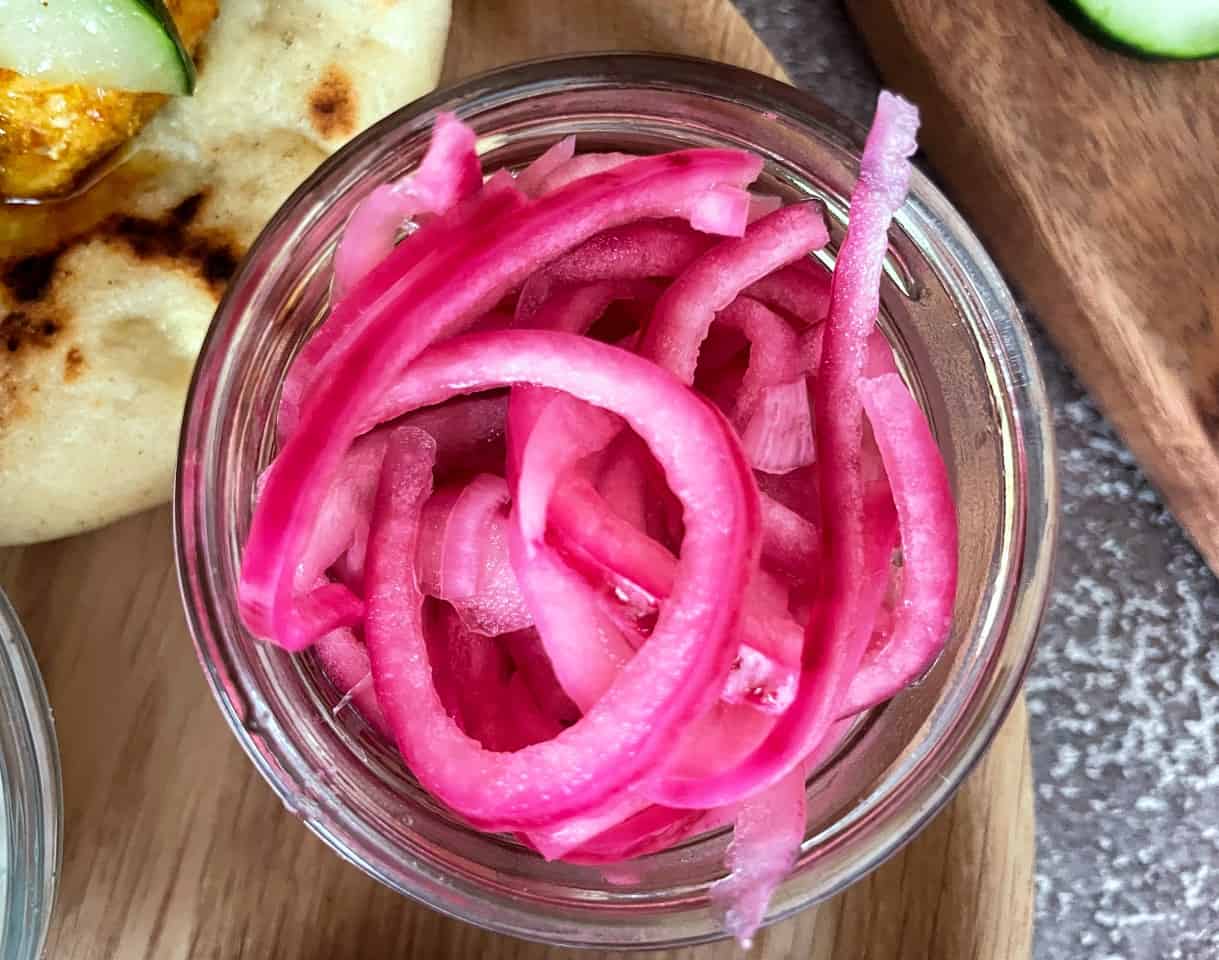
How to Make Quick Pickled Onions
- ½ red onion, thinly sliced (use a mandoline if you have one)
- ¼ cup apple cider vinegar
- ½ tablespoon sugar
- ¾ teaspoons salt
- ½ cup water
Place the water, salt, sugar, and vinegar into a saucepan and heat over medium heat until the sugar and salt have dissolved. Remove from the heat and pour the mixture into a jar with the sliced onions. Cool at room temp for an hour and then place in the fridge for at least 2 hours before serving.
Expert Tips for This Recipe
- As you can see in my photos, I wrapped my pitas in foil. This is to keep them nice and tight while eating otherwise all of those goodies tend to fall all over the place.
- I decided to cook my chicken whole first, cut it into pieces, and place it back in the pan to ensure every side was coated with the chicken marinade before serving. You can also cut your chicken first and then cook it.
- A warm pita is much easier to fold than a cold pita.
- You can also cut your pita in half and use it as a pocket instead of a wrap.
Recipe FAQs
Greek pita wraps with chicken can be a very healthy meal, especially when loaded with fresh vegetables and lean protein. However, the calorie count will vary depending on the ingredients and portion amounts. Be mindful of your dietary preferences and requirements.
Boneless, skinless chicken breasts or chicken thighs are the ideal choice for this recipe.
Yes, you can marinate the chicken in advance and cook it to save you time when you are ready to serve your meal. Simply heat up the chicken in a skillet on the stove before assembling the wraps.
Yes, you can substitute the chicken with grilled vegetables, falafel, or a plant-based protein to make a vegetarian or vegan version of these Greek pita wraps.
More Chicken Recipes to Check Out

If you get a chance to make these Greek Chicken Pita Wraps, tag me on Instagram or Facebook and show me, or leave a review below! You can also follow me on Pinterest and sign up for my e-mail list to receive more fun and delicious recipes in your inbox.

Greek Chicken Pita Wraps
Equipment
- small mixing bowl for cucumber
- cast iron pan or non-stick fry pan
- foil for wrapping (optional)
Ingredients
- 8 pitas (homemade or store-bought)
Chicken Marinade
- 3-4 medium boneless, skinless chicken breasts (about 1 lb)
- 3 tablespoon extra virgin olive oil
- 1 tablespoon lemon juice
- 1 tablespoon red wine vinegar
- 1 teaspoon paprika
- 1 teaspoon dried oregano
- ½ teaspoon kosher salt
- ½ teaspoon pepper
- 2 cloves garlic, pressed or minced
Toppings
- 1 cup tzatziki sauce (homemade or store-bought)
- shredded cabbage/iceberg lettuce
- diced tomatoes
- sliced cucumber
- sliced red onion (or use quick-pickled, see notes)
- feta cheese
Instructions
Chicken Marinade
- Mix all of the marinade ingredients (except chicken) in a mixing bowl. Add the chicken and ensure it is fully coated in marinade Cover the bowl with plastic wrap and marinate for at least an hour in the fridge.
Cook Chicken and Assemble Gyros
- Heat the skillet over med-high heat. Add the marinated chicken pieces and the marinade to the skillet and cook for 4-5 minutes on each side until fully cooked. Remove the chicken and slice it into strips. Add the chicken back into the skillet to get more of the marinade coated on the chicken pieces, just a minute or two.
- Take a pita bread and place it on a plate. Layer the sliced cucumber, tomato, cabbage/lettuce, and red onion slices first. Then add strips of chicken and top with Tzatziki sauce and feta cheese. Wrap in foil if desired to keep the gyro together while eating. Enjoy!
Video
Notes
- As you can see in my photos, I wrapped my pitas in foil. This is to keep them nice and tight while eating otherwise all of those goodies tend to fall all over the place
- I decided to cook my chicken whole first, cut it into pieces, and place it back in the pan to ensure every side was coated with the chicken marinade before serving. You can also cut your chicken first and then cook it.
- A warm pita is much easier to fold than a cold pita.
- You can also cut your pita in half and use it as a pocket instead of a wrap.
- Nutrition facts for a pita with chicken and tzatziki sauce only.
- ½ red onion, thinly sliced (use a mandoline if you have one)
- ¼ cup apple cider vinegar
- ½ tablespoon sugar
- ¾ teaspoons salt
- ½ cup water
Nutrition
Any nutrition calculations are only estimates using online calculators. Please verify using your own data.


Susan says
I made this with the sauce this weekend (right down to the pickled onions) and my family and I could not get enough! I can't believe how good everything was! I'll definitely be making this again! Thank you for the wonderful recipe! 🙂
Emily says
Thanks, Susan, that makes my day! I'm so glad you decided to add the pickled onions, they add the perfect final touch.
Mama Maggie's Kitchen says
This dish looks SO deliciously good. I wish I could eat that right now!
Emily says
Thank you!!