

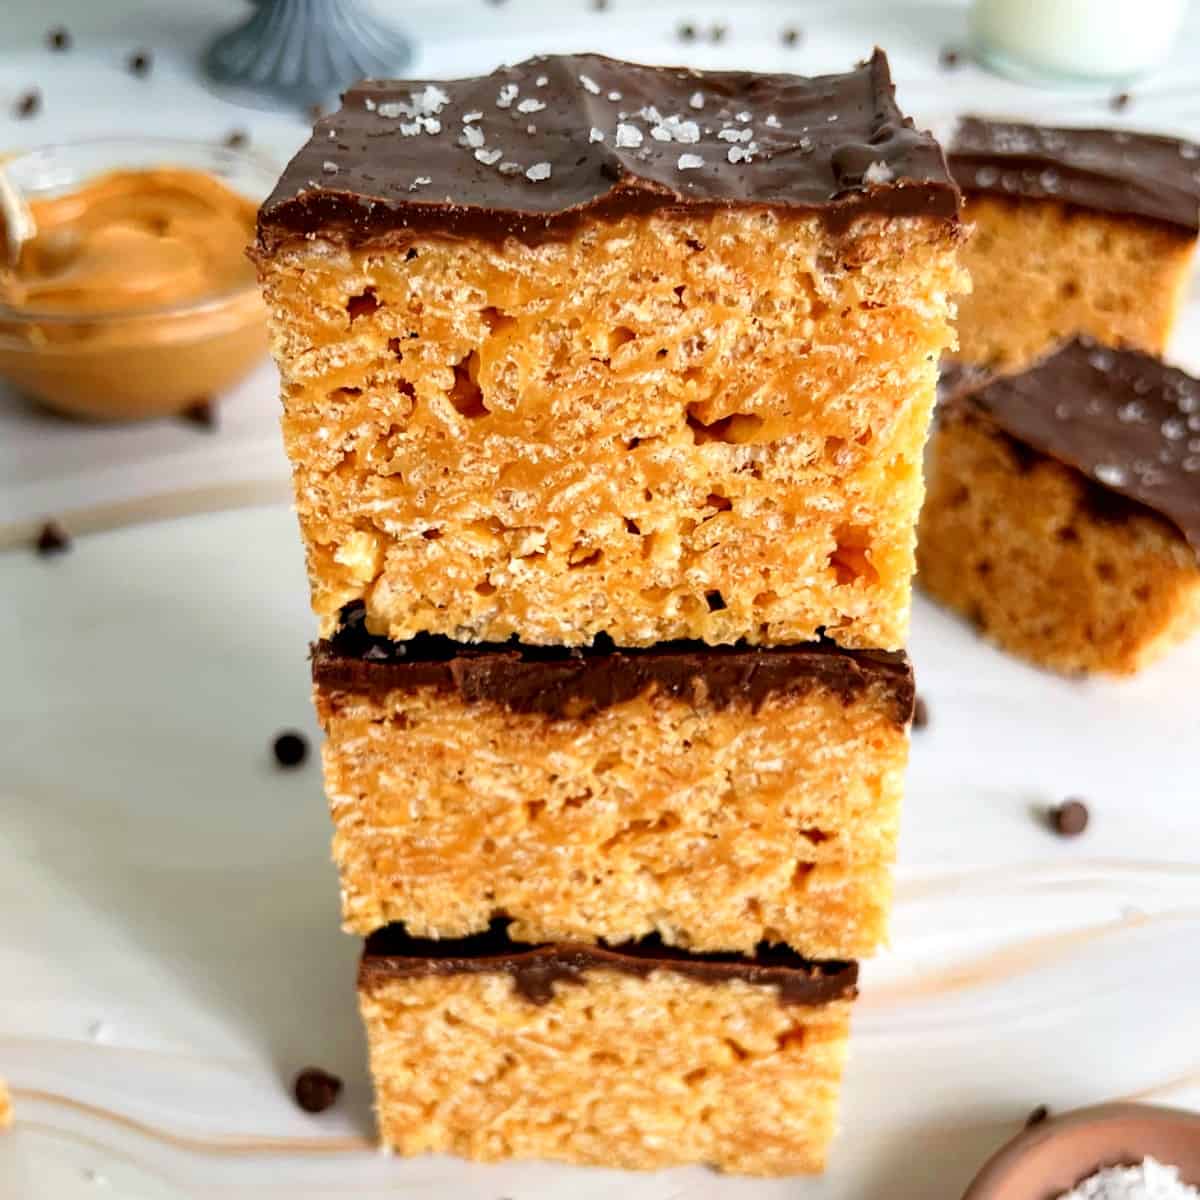
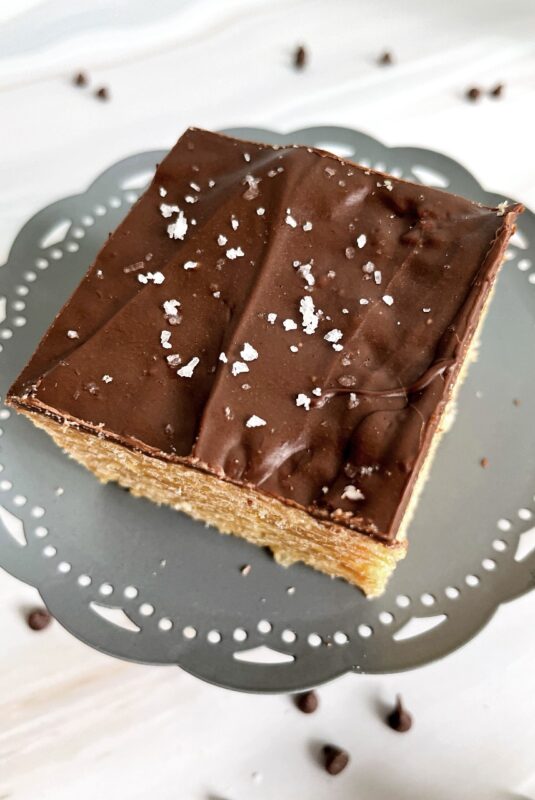
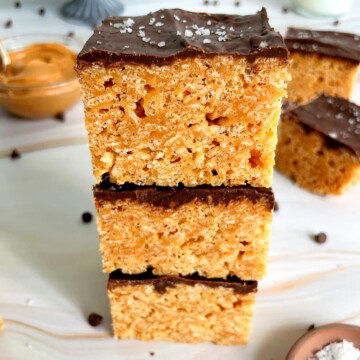
Take your favorite childhood treat to a whole new level with these Chocolate Peanut Butter Rice Krispie Treats! The addition of creamy peanut butter, a chocolate top layer, and a sprinkle of salt make these handheld treats irresistible!
Jump to:
Why I Love This Recipe
These Peanut Butter Chocolate Rice Krispie Treats remind me of a childhood dessert, like my Air Fryer Pop Tarts, but they are updated with chocolate and a sprinkle of flaked sea salt. You are getting crunchy, sweet, salty, and gooey all in one little square. Oh, and they are no-bake!
If you love Rice cereal treats as much as I do, check out some of my other variations like Cake Batter Rice Krispie Treats, Ube Rice Krispie Treats, and Rice Krispie Treat Stars.
Key Ingredients For This Recipe
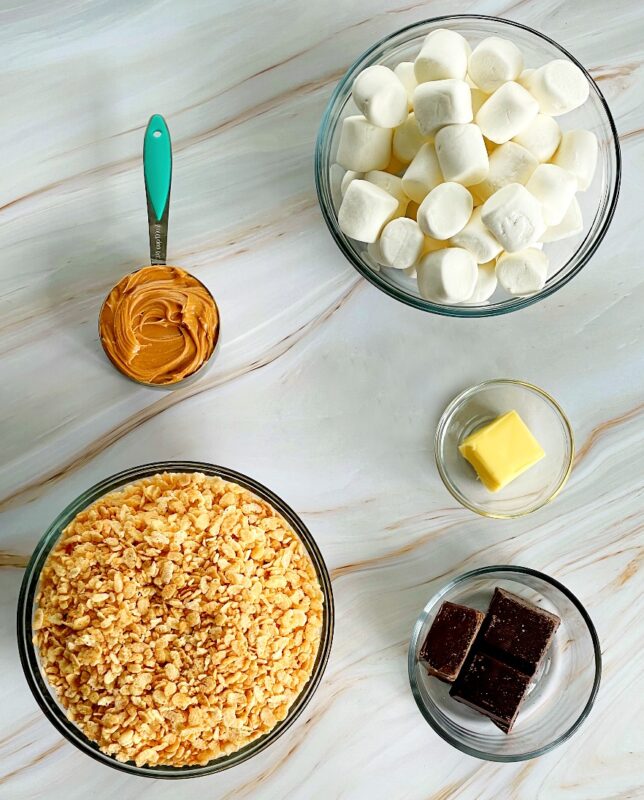
- Creamy Peanut Butter - Peanut butter is the star of the show. You can also use chunky peanut butter for extra texture in your treats.
- Crispy Rice Cereal - You can use name-brand or generic rice cereal for these treats; it won't make a difference in the final dessert.
- Chocolate Bark - You can use chocolate bark (also called almond bark) or chocolate chips for the chocolate coating on top of the treats. I used semi-sweet chocolate for mine; however, you can use dark chocolate or milk chocolate as well.
- Flaked Sea Salt - Adding flaked sea salt to the top of these treats enhances the flavors and makes them a little more sophisticated. This step is optional, but highly recommended.
*See the recipe card for the complete list of ingredients and quantities.
How to Make These Chocolate Peanut Butter Rice Krispie Treats
Coat a pan with butter. Place a piece of parchment paper across the bottom and up the side to create a sling. This will make it easier to remove the treats once they are set.
Add the peanut butter and butter to a large pot over medium-high heat, constantly stirring while they melt together. Turn down the heat to medium, add the marshmallows, and continue to stir until melted together.
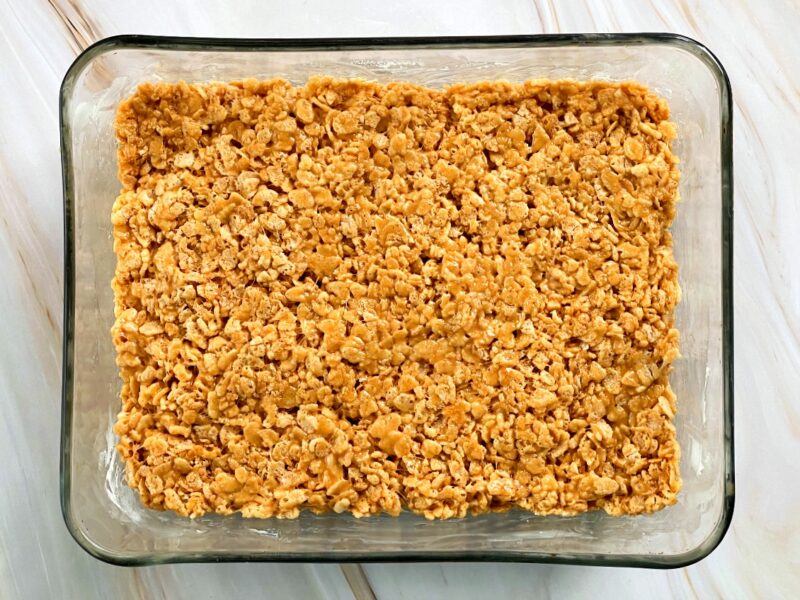
4. Remove the pot from the heat and pour in the rice cereal. Quickly stir everything together to coat all of the cereal. Pour the mixture into the prepared pan. Once cool enough to touch, gently press down on the top of the mixture to compact the treats.
While the treats are cooling, place the chocolate into a microwave-safe bowl. Microwave for 60 seconds, then remove it to stir. Continue to melt in 30-second intervals, stirring in between, until the chocolate is fully melted.
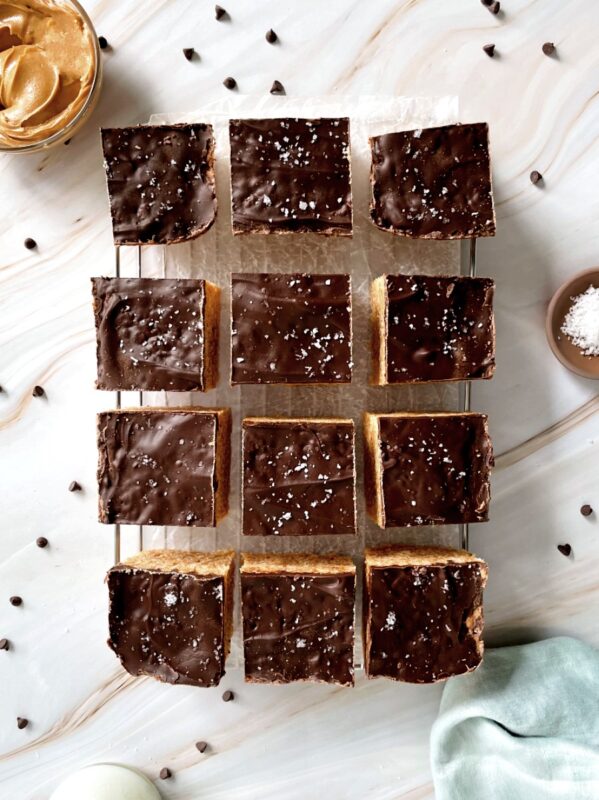
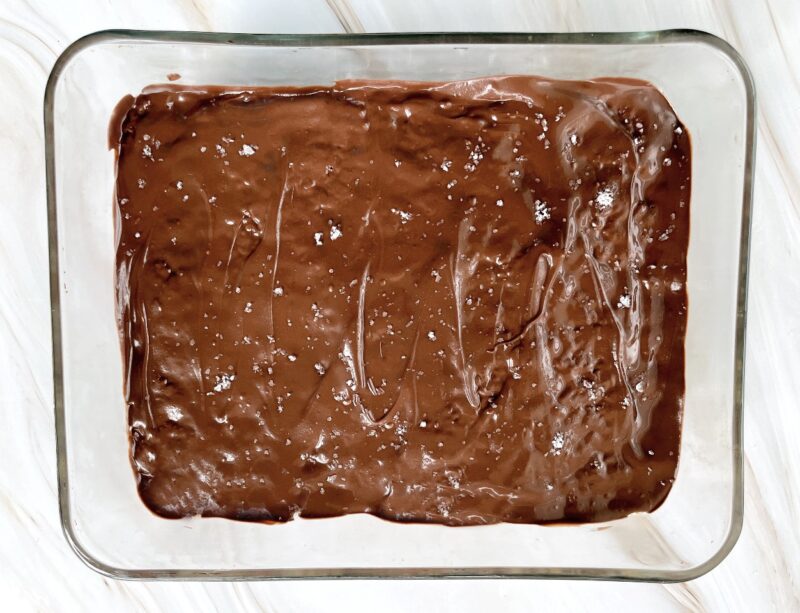
Carefully pour the melted chocolate on top of the treats and spread it into an even layer with the back of a spoon. Sprinkle the top with salt and allow the bars to cool for 2 hours.
Expert Tips for This Recipe
- To easily cut these treats into perfect squares, soak your knife in hot water before slicing. The knife will run right through the treats.
- I used a deep pot when making these treats; it helps keep the mess down and everything in the pan.
- I also used an 8x10 deep baking dish so that I had nice thick treats. A 9x13 pan would work as well, but add 4 more ounces of chocolate.
- As soon as you put the cereal mixture into the pan, soak the pot in hot water to make cleaning up easier.
- Put a little butter on your hands before pressing the treats down into the pan to prevent stickiness.
- Make a sling out of parchment paper to remove the bars more easily. My photo does not show this, and it was difficult to remove them.
- You can chill these in the fridge once they cool for a nice chilled treat.
- Store any leftover treats in a sealed container for up to 3 days.
FAQs
We recommend sticking with regular creamy peanut butter (like Jif or Skippy) for this recipe. Natural peanut butter tends to separate and has a looser, oilier consistency, which can make the treats greasy and harder to set properly. If natural PB is all you have, stir it very well first and expect a slightly softer result.
Yes! Chunky peanut butter works great here and adds a little extra texture to your treats.
Yes! Layer them between sheets of parchment paper in an airtight container and freeze for up to 6 weeks. Thaw at room temperature for about 30 minutes before serving.
If your treats turn out too hard, that usually means the marshmallows started to burn. Keep the heat at medium and stir constantly - as soon as everything is melted and smooth, pull it off the heat.
You can use name-brand or generic rice cereal, and it won't make a difference in the final result. Some people also love using Cocoa Krispies for an extra chocolatey base layer.
More No-Bake Recipes


If you get a chance to make these Chocolate Peanut Butter Rice Krispie Treats, tag me on Instagram or Facebook and show me, or leave a review below! You can also follow me on Pinterest and sign up for my e-mail list to receive more fun and delicious recipes in your inbox.
Chocolate Peanut Butter Rice Krispie Treats
Ingredients
- ¾ cup creamy peanut butter
- 3 tablespoons unsalted butter (plus a little more for the pan)
- 12 ounces marshmallows (full-size or mini)
- 6 cups crispy rice cereal
- 6 ounces chocolate bark or chocolate chips (dark, semi-sweet, or milk chocolate)
- 1 teaspoon flaked sea salt (optional, but highly recommended)
Instructions
- Coat a 10x8 or 9×13 pan with butter. Place a piece of parchment paper across the bottom and up the side to create a sling. This will make it easier to remove the treats once they are set.
- Add the peanut butter and butter to a large pot over medium-high heat, constantly stirring while they melt together.
- Once the peanut butter and butter are fully melted and smooth, turn down the heat to medium, add the marshmallows, and continue to stir. The marshmallows will fully melt into the mixture, this takes a few minutes.
- Remove the pot from the heat and pour in the rice cereal. Quickly stir everything together to coat all of the cereal. You must work quickly because the mixture will start to harden as it cools.
- Pour the mixture into the prepared pan. Once cool enough to touch, gently press down on the top of the mixture to compact the treats. You can also use the bottom of a cup.
- While the treats are cooling, place the chocolate into a microwave-safe bowl. Microwave for 60 seconds, remove from the microwave and give it a stir. Continue to melt in 30-second intervals, stirring in between, until the chocolate is fully melted, this should only take another 60-90 seconds.
- Carefully pour the melted chocolate on top of the treats and spread it into an even layer with the back of a spoon. Sprinkle the top with salt and allow the bars to cool for a minimum of 1 hour, 2 is best to allow the chocolate to set.
- When ready to serve, remove the bars from the pan and cut them into squares. Sprinkle the tops with a little more salt if desired and enjoy!
Video
Notes
- I used a deep pot when making these, it helps keep the mess down and everything in the pan.
- I also used an 8x10 deep baking dish so that I had nice thick treats. A 9x13 pan would work as well but add 4 more ounces of chocolate.
- As soon as you put the cereal mixture into the pan, soak the pot in hot water to make cleaning up easier.
- Put a little butter on your hands before pressing the treats down into the pan to prevent stickiness.
- Make a sling out of parchment paper to remove the bars easier. My photo does not show this and it was difficult to remove them.
- You can chill these in the fridge once they cool for a nice chilled treat.
- Store any leftover treats in a sealed container for up to 3 days.
Nutrition
Any nutrition calculations are only estimates using online calculators. Please verify using your own data.


Nancy says
Can you freeze these?
Emily says
Hi Nancy, Yes, they freeze well and can be stored in the freezer for a couple of months. To freeze them, cut the treats into squares, layer them with wax paper in an airtight container or freezer bag, and remove as much air as possible. They should be thawed at room temperature for about 15 minutes before serving
Marcia says
THE BEST peanut butter rice krispy bar ever!! So many compliments, so easy to make, TOO easy to eat, lol!!
Emily says
Thanks, Marcia!! I agree...way too easy to eat 😂 Enjoy!
Sandi says
I made these with my granddaughter & they were quick & easy. Instead of melting the chocolate in the microwave, I sprinkled chocolate chips over the top & placed them under the broiler for 3 minutes until they were melted & spread with an offset knife. Topped with salt flakes. So yummy!!
Emily says
Great idea, Sandi! I'm so glad you guys liked them 😊
Emmy says
my roommate and I have already made this twice. only thing different is we use vegan marshmallows, which work just the same it seems. 🙂
these are yummy.
Emily says
Amazing!! I'm so glad you guys love them. Enjoy 😁
Staci says
I needed to use up mini marshmallows I had but wanted something with chocolate peanut butter, figured I’d try this recipe out! Turned out good except if you use a 9x13 you definitely need more chocolate, mine barely spread to the edges.
Emily says
Hi Staci, thanks for letting me know! I made a note on the recipe card so others will have a heads-up. Thanks for trying the recipe!
Erika English says
This looks beyond amazing! Everything I love in one treat. Will be making these over the weekend!
Emily says
Thanks, Erika, I hope you love them!
nancy says
Such an easy to make and tasty dessert - everyone asked for the recipe at my daughter's bday party
Emily says
Awesome! Happy birthday to your daughter!
Marina says
Wow, what a treat! This peanut butter and chocolate combination is to die for, thanks!
Emily says
I totally agree, thanks, Marina.😊